Floating shelves are a stylish and functional addition to any home. They provide extra storage space, showcase decor, and create a modern, minimalist look. The best part? You can build a floating shelf in under an hour with just a few tools and materials. Whether you’re a DIY beginner or a seasoned pro, this guide will walk you through the process step by step.
Why Choose Floating Shelves?
Floating shelves are a popular choice for homeowners because they:
- Save space by utilizing vertical wall areas.
- Add a sleek, modern aesthetic to any room.
- Can be customized to fit any size or style.
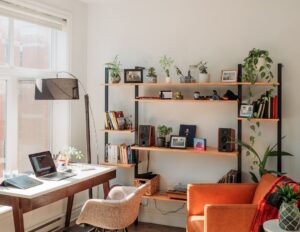
- Are perfect for displaying books, plants, photos, or decorative items.
Materials You’ll Need
Before you start, gather the following materials:
- 1×4 or 1×6 wooden board (cut to your desired shelf length)
- Sandpaper (120-220 grit)
- Wood stain or paint (optional)
- Clear coat or sealant (optional)
- 2-3 floating shelf brackets (depending on shelf length)
- Screws and wall anchors
- Level
- Drill
- Stud finder
- Measuring tape
- Pencil
Step-by-Step Instructions
Step 1: Measure and Cut the Wood
- Decide where you want to install the floating shelf and measure the space.
- Cut the wooden board to your desired length using a saw. If you don’t have a saw, most hardware stores can cut the wood for you.
Step 2: Sand and Finish the Wood
- Use sandpaper to smooth the edges and surfaces of the wood. This will prevent splinters and ensure a polished look.
- If desired, apply wood stain or paint to match your decor. Allow it to dry completely.
- For added durability, apply a clear coat or sealant.
Step 3: Locate Wall Studs
- Use a stud finder to locate the studs in the wall where you plan to install the shelf.
- Mark the stud locations with a pencil. If there are no studs in the desired area, use wall anchors to secure the shelf.
Step 4: Install the Brackets
- Hold the floating shelf brackets against the wall, aligning them with the stud marks.
- Use a level to ensure the brackets are straight.
- Drill the brackets into the wall using screws. Make sure they are securely attached.
Step 5: Attach the Shelf
- Slide the wooden board onto the brackets.
- Secure the shelf to the brackets using screws from underneath or inside the shelf for a seamless look.
Step 6: Style Your Shelf
Once the shelf is securely installed, it’s time to decorate! Add books, plants, picture frames, or other decorative items to personalize your space.
Tips for Success
- Choose sturdy brackets that can support the weight of your shelf and its contents.
- If you’re installing multiple shelves, space them evenly for a balanced look.
- Use a level at every step to ensure your shelf is straight.
- For a seamless floating effect, consider using a router to create a recessed area for the brackets inside the shelf.
Final Thoughts
Building a floating shelf is a quick and easy DIY project that can transform any room in your home. With just a few tools and materials, you can create a functional and stylish storage solution in under an hour. Whether you’re a DIY enthusiast or a beginner, this project is perfect for adding a personal touch to your space.
So, grab your tools and get started on your floating shelf today! Don’t forget to share your finished project on social media and inspire others to try this simple yet impactful DIY project.